You are here
Rating Soil Erosion
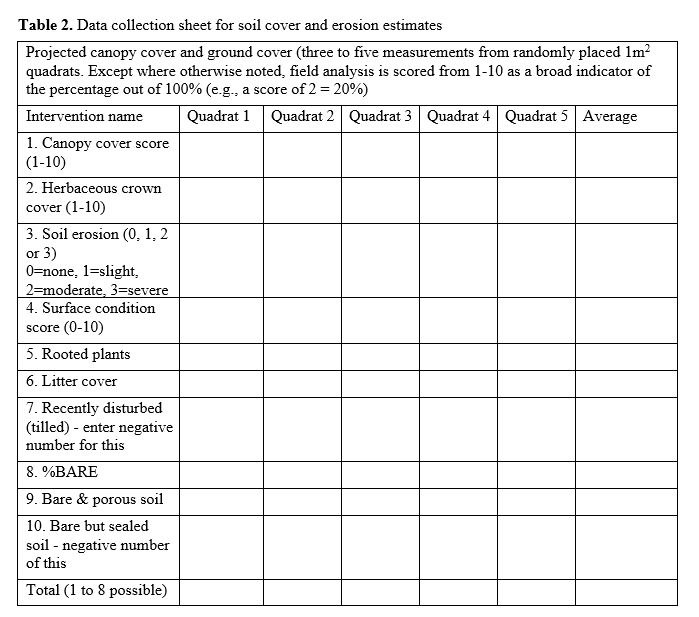
When comparing different interventions at the field scale, several of the factors that affect erosion are similar, e.g., the slope and rainfall intensity would be similar for neighboring fields. The factors that differentially affect the soil surface exposure and disturbance, however, are important to consider and are related to the vegetative cover and soil management practices.
How to operationalize the metric
Method of data collection and data needed to compute the method:
The concept we use here (but not the method) is loosely based on Ludwig and Tongway (1995). Details for this method were modified for the Vital Signs project and are provided below from the E-Plot Biomass Measurements (Vital Signs, 2014).
Background information for soil quality indicators
Soil Sampling
Before detailing the various soil quality indicators (e.g., measurement of soil carbon, soil chemical and physical quality attributes), this section addresses the methods to obtain a representative sample from the fields of interest.
Procedure for field soil sampling
Soil sampling equipment
- Soil auger (open end or closed end depending on soil type, closed for sand) or soil probe or trowel
- Bucket, basin or any open type of container
- Study plastic bags and tins
- Labels
- Permanent marker
Soil Sampling Steps
5) Familiarize yourself with the plot dimensions
a. Know where field boundaries are; b. do not sample areas that are unusual – e.g, termite mounds, tree stump areas; c. if the field is large then evaluate to see if more than one soil type is present, based on visual observations of apparent texture and color, then delineate the field based on the main soil types and sample each separately.
6) Collect about five to ten* sub-samples for each field, plot or soil type area, for a topsoil sample usually a 0- 20cm depth is sampled, subsoil sample is usually from 20 to 40 cm. If the plow layer is deeper then a 25 or 30 cm topsoil sample can be collected, and for some research objectives such as investigating soil microbiology then the top most layer (0-5 cm for example) may be sampled.
*Choose a set number of sub – samples to be taken such as 8 and keep it consistent throughout the sampling
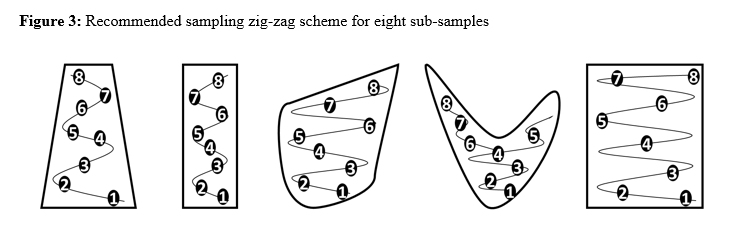
7) Take sub-samples of soil following a zig-zag path through the plot (See below sample diagrams)
8) Starting at one corner of the plot, first move away from the edge towards the center, then move through the plot in a random zig-zag manner to collect samples (five to ten, per above) to place in a container and mixed well, this is a composite soil sample that represents the plot. Take more samples if the plot is large, or if you are measuring inorganic nitrogen which is often heterogeneously distributed.
9) Samples can be collected with either process depending on which tool is used.
a. Soil auger
- Brush aside residues from sampling site (such as leaves and plant materials)
- Insert the auger directly into the soil (20 cm = 8 inches) in a vertical (up and down) position
- Carefully remove the auger (avoid any spillage of sample). If soil is dry at sampling time, slightly tilt the auger back to avoid it spilling from tube
- Place the sample in the container and move on to the next
b. Trowel
- Remove residues (such as leaves and plant materials, brush off)
- Insert the trowel vertically (up and down) into the soil (20 cm = 8 inches)
- Gently push back on the handle and remove the soil (ensuring that you obtain the soil at insertion depth)
- Place the sub - sample in the pail and move on to the next site
10) After all samples are collected mix up the soil very well and use this soil to fill a bag
- Remove any large stones sticks or roots from the sample
- Break up any soil clods with your hand
- Mix by hand very well for at least a minute until all the soil is homogenized
- Collect about one-quarter of the sample (or about 500g) to put in a bag (remaining soil should be returned to field), use the ‘pie’ method of dividing the soil in the container by dividing in quarters and collecting one slice of the pie. This ensures all layers of soil are collected, as soil will tend to ‘self-sieve’ by texture so important to collect a representative quarter or so of the soil.
11) Label the sample bag with the following:
- Date
- Sample ID
- Farmer name or number (if number check that the number is correct based on the list)
- Location (GPS coordinates)
- Treatment
12) Place a small piece of paper with the following information written in pencil into the sample bag:
- Date
- Sample ID
- Farmer name or number
- Location
- Treatment
13) Securely twist and tie the plastic bag with the sample and store for transport
 Source: Snapp et al. Unpublished
Measurements conducted in the field with hand-held monitoring equipment can provide complementary information, or act as a substitute for soil sampling. This is an active area of research and in-situ field soil and plant monitoring is becoming a reality that can be used by field practitioners and scientists (Rossel and Bouma, 2016; Snapp and Morrone, 2008). However, it is important to keep in mind the highly heterogeneous nature of soil and plant properties, both in terms of space and time. This is illustrated by the hand-held devices to assess light reflection, where specific wavelengths are monitored with well-characterized relationships to plant stress and chlorophyll content (and positively correlated with nitrogen content). Careful sampling strategies and dozens of readings per plot are required, using comparable leaf phenology, in order to characterize plant chlorophyll status. This is due to the high variability that occurs at the sub-meter and meter level (Markwell et al., 1995).
Preparing soils for carbon, nutrients, acidity, salinity tests
Once the soil has been sampled it must be dried, cleaned, and sieved before chemical analyses can be carried out. The following boxes provide step-by-step instructions for preparing soil samples for chemical analyses.
Soil Moisture Measurement and Drying
If one of the indicators relates to soil moisture, then the soil sample can be analyzed to determine the soil moisture content as follows:
- Get a soil tin, mark it with a number.
- Weigh the tin to the nearest 0.1g.
- Add some of the moist soil to the tin – fill as much as possible.
- Weigh the tin plus soil.
- Dry the soils as follows:
a. Place the opened tin plus the soil with the lid (fit on the bottom of the tin) into a dryingoven at 105 oC for 48 hours, or until a constant weight is obtained.
b. Once soil is dry, close the tin by replacing the lid back on the top of the tin.
6. Weigh the tin plus the oven or air-dried soil, including the lid, to the nearest 0.1g.
Note: The soils in the bags should ideally be oven dried at 105oC. If however, there is no need to determine soil moisture then the soils can be air dried. Place the soil on a clean surface (plastic sheet, shallow bowl or similar), spread the soil out thinly and put the soil where it will not get wet from rain or soil blown by the wind. Mix the soil occasionally to ensure all the soil is dried. Depending on how wet the soil is, the amount of soil and the climatic conditions – it can take less than a day or several days to dry the soil.
(excerpted fro Vital Signs, 2014b, pp 20)
Cleaning and Sieving Dry Soil
In this procedure, the soil sample in the bag will be divided into soil that passes through the 2 mm sieve (the soil fine fraction) and the gravel that does not pass through the 2 mm sieve (called the coarse fraction). No material should be discarded.
- Once the soils are air dried, weigh the whole soil sample to the nearest gram. Record the weight.
- Grind the soils using a wooden rolling pin, gently crushing the sample. While crushing, remove any plant materials (e.g. roots).
- Remove and save any possible pieces of gravel (making sure they are gravel and not soil aggregates) and place in a separate small plastic bag (the coarse fraction).
- Sieve the soil sample by passing the crushed sample through the 2 mm sieve. DO NOT use the sieve as a grinder: do not rub or mash the soil on the sieve, but shake the sieve gently to allow the soil to pass through.
- Remove and save any gravel that remains on top of the sieve and place it in the plastic bag with the other gravel.
- Once the entire sample has been sieved, place the soil in a plastic bag.
- Weigh and record the weight of the soil that passed through the 2 mm sieve, record to the nearest gram.
- Weigh and record the weight of the gravel fraction that did not pass through the 2 mm sieve, record to the nearest gram.(Excerpted fro Vital Signs, 2014b, pp 22)


