You are here
labile or "Active Carbon"
Changes in these active fractions of soil carbon appear to estimate the trajectory of total SOC (decreasing or increasing) and can be used to compare different treatments and management practices a year or so after installation.
How to operationalize the metric
Method of data collection and data needed to compute the method:
This procedure describes a technique for the determination of oxidizable carbon in soil samples by a dilute solution of permanganate, termed POXC. This procedure is synonymous with the “Active Carbon” method described by Weil et al. (2003) and is adapted with help from J.D. Glover (The Land Institute, Salinas, KA) and M. Barbercheck (Pennsylvania State University, University Park, PA). Active carbon is often considered a labile form of carbon that is more easily decomposed by soil organisms; in contrast to total SOC, active carbon can change quickly with different soil management practices. POXC correlates well with SOC and can be considered a proxy for total SOC. It has recently been proposed that POXC relates to the longer term build up, or storage, of soil carbon (Hurisso et al., 2016).
The procedure for determining POXC in detail is as follows:
I. Instrumentation and Materials:
- Spectrophotometer capable of reading absorbance at 550nm
- Weighing balance capable of accurately weighing ~2.50g of soil to two decimal places (0.01g)
- pH meter calibrated for measurement in the range of ~6.0-8.0pH and NaOH for pH adjustment
- Oscillating (or horizontal) shaker capable of at least 240 oscillations per minute (or 120rpm)
- Magnetic stir plate and stir bars
- Adjustable 10ml pipettor and tips
- Adjustable 100-1000µl pipettor and tips
- (2) Adjustable bottle-top dispensers fitted to a bottle of deionized water and calibrated to deliver 18.0ml and 49.5ml
- 50mL disposable polypropylene centrifuge tubes with caps (Falcon tubes)
- Laboratory glassware for reagent preparation and waste collection
- Labeling supplies such as permanent markers and tape
- Reagent grade Potassium Permanganate (KMnO4; FW=158.03g mol-1)
- Reagent grade Calcium Chloride, Dihydrate (CaCl2·2H2O; FW=147.01g mol-1)
- Soil standard (sieved and air-dried KBS topsoil for use as a lab reference sample)
- Timer capable of tracking time for two and ten minute intervals
II. Reagent Preparation:
KMnO4 Stock Solution 0.2M (makes 1 liter, 2ml use per soil sample):
- Weigh 147g of CaCl2 and place in a 1000ml beaker. Add approximately 900ml of deionized water and stir till dissolved. Transfer to a 1000ml volumetric flask or graduated cylinder. Bring to volume with deionized water.
- Weigh 31.60g of KMnO4 into a 1000ml beaker and add approximately 900ml of the CaCl2 solution. Place on the magnetic stir plate (minimize exposure to light) with gentle heat and stir until dissolved completely. Note: Dissolution may be very slow.
- Once dissolution is complete, place the probe from a calibrated pH meter into the solution (with continued stirring) and measure the pH. Adjust the pH to 7.2-8.5 by adding 0.1N NaOH, 1 drop at a time (endpoint approaches rapidly). Note that it can be challenging to adjust pH, and note in the record what pH that is achieved. With the CaCl2 solution, adjust volume in a 1000ml volumetric flask or graduated cylinder. Transfer to a brown glass bottle and store in a dark place (stable 3-6 months).
III. Standard preparation:
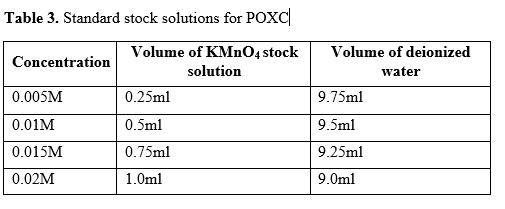
Four standard concentrations (0.005M, 0.01M, 0.015M and 0.02M) prepared from the KMnO4 stock solution. The standard preparation involves first making a standard stock solution and then diluting each standard stock solution to a final working standard. The following materials will be needed:
- 50mL disposable polypropylene centrifuge tubes
- Adjustable 1.0-10.0ml pipettor and tips
- Adjustable 100-1000µl pipettor and tips
- Adjustable bottle-top dispensers fitted to a bottle of deionized water and calibrated to deliver 49.5ml
Part 1 - Standard Stock Solutions: Use the table below to prepare standard stock solutions. These stock solutions can be prepared in centrifuge tubes or in small brown glass bottles and used for three days (stored in glass and in the dark).
Part 2 - Dilution Step: Dilute each standard stock solution to a working standard by adding 0.5ml of each stock solution to 49.5ml of deionized water in 50ml centrifuge tubes. These tubes contain the working standards and should be prepared fresh daily.
IV. Sample Preparation:
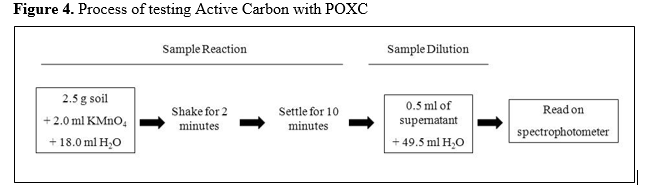
Sample preparation involves a two-part process: a sample reaction and sample dilution, as illustrated below.
A soil standard and solution standard are prepared in the same manner as the unknown samples. The soil standard serves as a laboratory reference sample. It is recommended to homogenize a large batch of air-dried soil for long-term use. The soil standard allows for a quality control check across POXC analyses performed on different batches, over multiple days, or with different reagents. The solution standard serves as another quality control reference. It is prepared in the same manner as the unknown soil samples, but without the soil. The solution standard will reveal if reagents or labware have been contaminated with oxidizing agents or carbon and thus serves as a true blank.
It is important that the timing of each step be consistent, particularly the shaking and settling times. The permanganate will continue to react with the soil as long as it remains in contact. Hence, working quickly with small batches of 10 samples or less is advised.
The following materials will be needed:
- (2) 50ml disposable polypropylene centrifuge tubes with caps for each sample
- Adjustable 1.0-10.0ml pipettor and tips
- Adjustable 100-1000µl pipettor and tips
- (2) Adjustable bottle-top dispensers fitted to bottles filled with deionized water and calibrated to deliver 18.0ml and 49.5ml
- Labeling supplies such as permanent markers and tape
- Oscillating shaker capable of at least 240 oscillations per minute (or 120rpm) and fitted with a lidded box that will hold at least ten 50ml centrifuge tubes
- Timer capable of tracking time for two- and ten-minute intervals
- Soil standard (pulverized, homogenous soil as lab reference sample)
A. Sample Reaction
- Label two 50ml centrifuge tubes for each sample. Weigh 2.50g (± 0.05g) of sieved, air-dried soil into one of the centrifuge tubes (may be done in advance). A soil standard should also be prepared. Place the other set of tubes aside.
- Add 18.0ml of deionized water to each of the centrifuge tubes containing the soil. Using the 1.0-10.0ml pipettor, add 2.0ml of 0.2M KMnO4 stock solution to each tube.
- Prepare a solution standard by adding 18.0ml of deionized water and 2.0ml of 0.2M KMnO4 stock solution to a tube (no soil) and process in the same manner as the unknown soils.
- Working quickly, cap tubes tightly and hand-shake each tube vigorously for two seconds to assure soil dispersion within the solution.
- Place tubes on shaker and shake at 240 oscillations per minute for two minutes.
- After two minutes, remove samples from shaker and swirl or shake the tube vigorously to ensure that there is no soil clinging to the sides or cap of the tube. At this point, remove caps to avoid further disturbance of soil after settling. Place the samples in a dark area and allow soil to settle for 10 minutes. Settling time is a critical step so a timer is essential.
B. Sample Dilution
While samples are settling, add 49.5ml of deionized water to the second set of centrifuge tubes (may be done in advance).
Once the ten minute settling period has passed, quickly transfer 0.5ml of supernatant (liquid above the solid, avoiding any particulate matter) to the second tube containing 49.5ml of water. Note: This step should be performed as quickly as possible as the permanganate will continue to react with soil as long as it remains in contact.
Cap the second set of tubes and invert to mix. These are the final sample solutions for analysis. They are stable for up to 24 hours if stored in the dark.
C. Reading Samples on Spectrophotometer
This method has been shown to perform well on both single cuvette machines and 96-well plate reading spectrophotometers. If available, a 96-well plate reader is recommended to save time (see steps 2-5 below).
Clear polystyrene flat-bottom cell culture plates (or equivalent) work well, so more expensive UV-transparent plates are not necessary. Fill each well with 200µl of solution.
It is recommended to replicate all standards on a plate, including blanks of deionized water. Running each standard three or more times and taking the average typically yields good results.
Determine and record the absorbance (optical density) of standards and unknowns at 550nm using spectrophotometer software.
Subtract out average of deionized water blanks from all absorbance values (if not automatically performed by software). The intercept of the standard curve should be very close to zero.
D. Clean-up and Disposal
Leaving the centrifuge tubes capped but on the bench top for a week or more will allow the permanganate to completely react with the soil and lose all purple pigmentation. Liquid can then be safely disposed of down the sink and tubes with soil thrown out or cleaned and reused. The second dilution of samples and standards contains very little KMnO4 and may be safely flushed down the drain with copious amounts of water; however, check with your environmental health and safety department to ensure compliance with your department’s procedures.
Unit of analysis:
The amount of carbon oxidized is a function of the quantity of permanganate reduced. Consequently, the higher the POXC values the lower the absorbance (intensity of the color of the solution). Calculating “Mass of POXC for Unknown Soil Samples” can be done using the following equation, after Weil et al. (2003):
POXC (mg kg-1 soil) = [0.02 mol/L - (a + b × Abs)] × (9000 mg C/mol) × (0.02 L solution/Wt)
Where: 0.02 mol/L = initial solution concentration; a = intercept of the standard curve; b = slope of the standard curve; Abs = absorbance of unknown; 9000 = mg of carbon oxidized by 1M of MnO4 changing from Mn7+ --> Mn4+; 0.02 L = volume of stock solution reacted; Wt = weight of air-dried soil sample in kg.
Example Calculation:
Construct a standard curve with the values in the following table: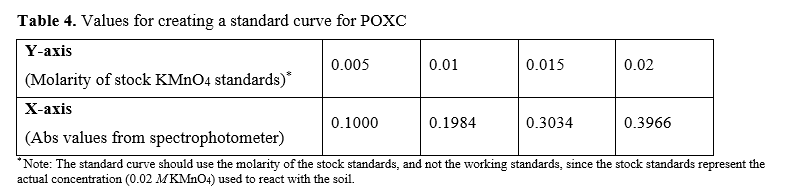
This produces the regression line: y = 0.0502x - 0.00004; R² = 0.999
Unknown sample absorbance: 0.3087; unknown sample soil weight: 2.48g

Limitations regarding estimating and interpreting:
This method requires significant equipment and supplies. The procedure is detailed, requiring someone with experience in wet chemistry. Results from this method should only be compared among soils from the same site under different management practices – it is not yet clear that it can be used to compare soils between sites.
Method of data collection and data needed to compute the method:
Another means of assessing Active Carbon is through measurements of the short-term release of CO2 from the soil. The amount released and compared among treatments has recently been associated with forms of C in the soil more readily decomposed than those assessed through POXC (Hurisso et al., 2016). It seems to be associated with recent additions of organic matter to the soil and should thus be an appropriate measure (along with POXC) for comparing soils under different management treatments (Culman et al., 2013). Again, these comparisons should be made for treatments or different management situations on a farmer’s fields of the same soil type. The CO2 evolved can be measured several ways. If a gas analyzer is available the method below can be used. One of the most widely used methods is based on an alkali trap that is placed in the container with the soil sample for the incubation period, then removed and titration used to measure the amount of CO2 trapped. A convenient Solvita method recently has become available that relies on a gel for detection of CO2 in lab or field-based incubations (Haney et al., 2008).
The challenge with all soil respiration and MINC methods is that for reproducible and comparable results, the soil moisture status needs to be consistent, preferably 50% Water-Filled Pore Space (WFPS). This can be calculated as shown in the Appendix, based on the Haney and Haney (2010) method. Or, a simplified approach that is promoted by Solvita (https://solvita.com/) is to use the equation:
![]()
An assessment of how to use Solvita is available from the USDA. See the “Soil Respiration” guide for educators on this website: https://www.nrcs.usda.gov/wps/portal/nrcs/detailfull/soils/health/assessment/?cid=nrcs142p2_053870.
CO2 evolution from wetting a dried soil (capped IRGA method)
Abstract:
This procedure describes a technique for the determination of CO2 respired from air-dried soil that has been rewetted. The method is described in detail by Franzluebbers et al. (2000).
The procedure described below uses an infrared gas analyzer. Incubation times can vary from one to three days, or longer. The Snapp lab has found treatment sensitivity and decreased analytical variation with one-day incubations that are closely correlated with results from longer-term (3-,7- and 24-day) mineralization, so for convenience we recommend a one-day incubation.
Materials:
- Ball ® Mason canning jars (half-pint or quart size)
- Lids and rings for canning jars
- Rubber septa for jar lids
- Plastic specimen containers (100ml) or glass beakers (100ml)
- 5ml
- Syringes (1ml and 3ml)
- Syringe needles (25 gauge, 1-inch and 1.5-inch)
- Gas tank – 1% CO2 (99% N2) + regulator
- Gas tank – Helium or N2 + regulator
- Septa for IRGA – SS174 Teflon Faced Septa 11mm (100/pkg) from Supelco Catalog #2-2731 (http://www.sigmaaldrich.com/analytical-chromatography/analytical-chromatography-catalog.html)
Equipment:
- Balance for weighing soil
- LI-820 infrared gas analyzer (IRGA)
- LI-820 software
Prior to set-up:
Drill holes into canning jar lids the size of the septa (or rubber stoppers) and insert septa into holes. Make sure they are airtight. This can be accomplished by sealing with vacuum grease around the septa if necessary.
Set-up:
- If not known, determine water holding capacity and moisture content of air-dried, sieved soil (Haney and Haney, 2010).
- Weigh 10g air-dried soil into 100ml containers and place containers in canning jars. Label canning jar lids (containing septa). (This can be done ahead of time. Rewetting the soils and baseline IRGA measurement should be done one jar at a time.)
- Adjust moisture to 50% water holding capacity (50% WFPS) by adding determined volume of deionized water evenly over the surface of the soil with a 5ml pipettor, or if a pipettor isn’t available, use a syringe.
- Seal jar with labeled lid (containing septa) and ring.
- Determine a baseline CO2 reading with the IRGA:
- Insert emptied syringe through the septa of incubation jar, drawing air in and out repeatedly (~ five times) to mix.
- Expel air in syringe until there is 0.5ml of air exactly in syringe.
- Remove syringe of incubation jar and inject in IRGA septa port.
- Record injection time.
- Record starting weight for jar + beaker + wetted soil.
- Place jars into 25°C incubator in the dark.
Measurements (day 0 and day 1):
- Turn on gas tank containing IRGA carrier gas (N2 or helium).
- Calibrate to zero after 10 minutes of running the carrier gas.
- Create IRGA standards in septa jars labeled A, B, and C: insert syringe needle into jar’s septa to act as a vent, and then inject CO2/N2 mix from gas tank into jar for one minute. Remove standard jar from gas tank, then remove vent needle after jar has depressurized (listen for the air escaping from the vent needle, then remove as air stops venting).
- Start logging measurements.
- Take CO2 measurements by removing 0.5ml air from the jar with a 1ml syringe and injecting it into the IRGA. Standards should be run first and last (two to three times each).
- Record the injection time for each sample. Wait until the ppm returns to zero before entering the next sample.
- After taking CO2 readings, stop logging. Return sample jars to the incubator.
- Note: on the last day of measurements, record the weights for the jars (+ beaker + soil). Any substantial weight difference from day 0 to the last day may indicate leakage.
Unit of analysis:
Content here
Limitations regarding estimating and interpreting:
Content here