You are here
Aggregate Stability
Soil particles can be held together by soil organic matter or the chemical attraction of clay particles (the stability of aggregates varies with the type of clay minerals in the soil). These aggregates contribute to the distribution of the pore space and sizes in the soil, which in turn affect the rates of water infiltration, gas exchange, and water holding capacity. Rates of water runoff and erosion are generally less in well-aggregated soil. Aggregates can fall apart as soil organic matter decomposes and as the soil is disturbed through tillage and compaction. The stability of aggregates is a function of the soil chemical, physical and biological processes.
How to operationalize the metric
Method of data collection and data needed to compute the method:
Aggregate Stability
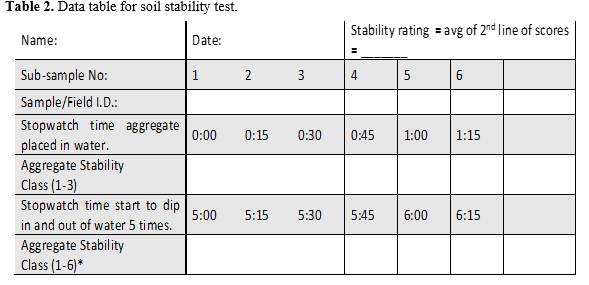
Aggregate stability is measured by the aggregates’ resistance to slacking by water or crushing by physical pressure. It can be quantitatively assessed in the lab. If maintaining or rehabilitating soil is a major objective of a management intervention, then one might look for a laboratory that provides this analysis. There recently are more qualitative assessments of water-stable aggregates that provide a very good indicator of the relative stability of the soil under different management practices. Details for this procedure are provided below (Weil and Gatere, 2016) in a data table designed for six samples from a single soil. A receptacle sieve to assess aggregate stability is crafted from a 2mm screen attached to the bottom of a PVC tube. Two divided boxes with six compartments are used: one to hold the dry samples and one to be filled with water for the stability assessment.Follow the steps below for the different soils that will be compared.
Step 1. Fill in sample ID in the table below and select six 7-9mm diameter aggregates for the soil sample. Gently place each aggregate in a sieve and the sieve in a compartment of the dry, divided box. Make sure the samples are air-dry.
Step 2. Fill the empty (no sieves) box with water (preferably deionized, but rain or bottled drinking water will do).
Step 3. Fill each compartment to 2cm depth. The water should be approximately the same temperature as the soil.
Step 4. Test the samples in the following manner:
Step 5. Slowly lower the first sieve with its sample into the respective water-filled compartment (e.g. upper left corner of sample box to upper left corner of water box). Start timer.
Step 6. From the time the sieve screen touches the water surface to the time it rests on the bottom of the box, 1 second should elapse. Watch samples closely for 30 seconds.
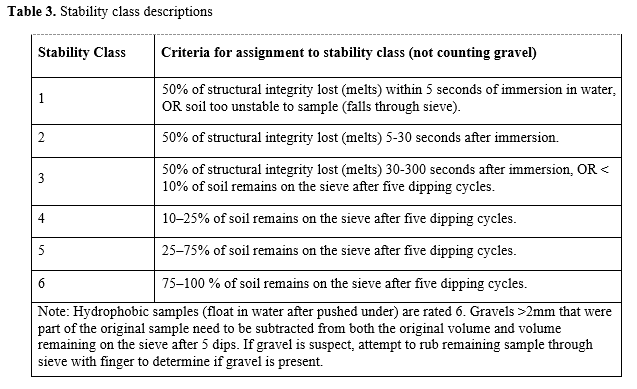
Step 7. Immerse another sample every 15 seconds. Beginners may want to immerse a sample every 30 seconds. As you observe the samples, use the table to assign samples to stability classes 1 or 2.
Step 8. Observe the samples again at 5 minutes (300 sec) after they were placed in the water and record a stability class (1, 2 or 3) in the table.
Step 9. After the 5-minute observation, raise the sieve completely out of the water and then lower it to the bottom (without touching the bottom of the tray) a total of five times, taking 1 second to move the sieve in each direction (2 seconds total for each round of dipping). Do this even if you have already rated the sample a 1, 2, or 3. You should change a 1, 2, or 3 rating if >10% of soil remains on sieve after sieving. If <10% of soil remains on the sieve after five dipping cycles, repeat the rating of 1, 2, or 3 in second data row.

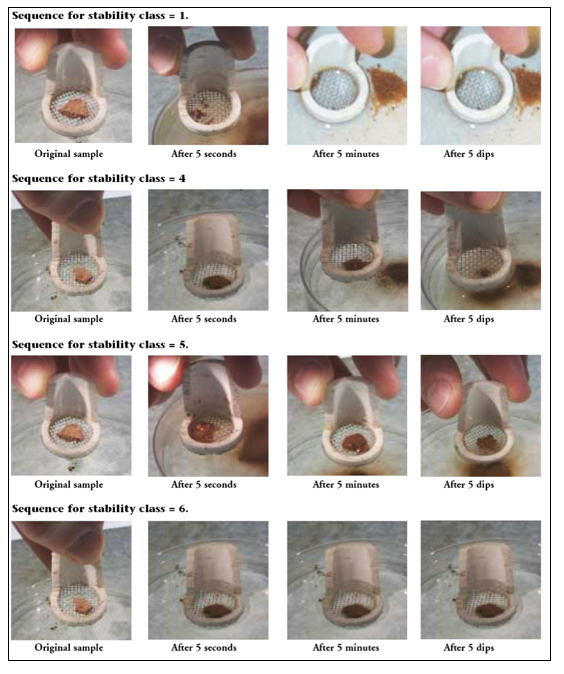
 Figure 4. Illustration of soil stability classes. Note that actual soil clod or aggregates should be about 1/4 inch in diameter (Herrick, et al., 2005).
Unit of analysis:
Content here
Limitations regarding estimating and interpreting:
Content here


